Finding the Contacts Page
From the smrtPhone Dashboard, you can easily access an address book that contains all of your contacts that are synced with your CRM. You can search, see all phone numbers associated with a contact, view contact history, update, and even call/text from the Contacts section of smrtPhone.
Only Account Owners and Users with granted permissions can access the Contacts Page.
To access your address book, click on the Contacts button on your Admin Dashboard or access it from your Inbox.

Learn how to access Contacts from Inbox ⇢
All your contacts are sorted alphabetically, and clicking on a contact shows you all the actions you can take:
-
All phone numbers associated to the contact
-
View contact in CRM
-
Edit contact
-
Pair Caller ID
-
Delete contact
-
DNT/DNC (if the case)
-
Communication History (if the case)
-
Call the contact
-
Text the contact - you can use SMS templates
-
Video call
Adding a New Contact
You can easily add a contact from within smrtPhone that will be synced back to your CRM. On the upper right part of the screen, click the New Contact button to add new contacts in your account.

Please complete all required fields. A contact that misses the Last / First name or the Phone Number cannot be saved and might generate an error message.
Once you have completed all fields, you can now press the Save button, and this new contact will be added to your list and synced to your CRM.
DNC and DNT Badge
In this place, you can also see if the contact has any numbers enrolled in the DNC/DNT list. When you click on the contact's name, the system will display a red badge next to the contact's phone number, reminding you of the fact that they have numbers added to the Do Not Call or Do Not Text list.
You can see the entire list of DNC numbers stored in your system by accessing your smrtPhone Dashboard > Admin > DNC Numbers. The DNT badge is also available in the Contact's Details.
You cannot even text any contact placed on the DNC List.
Read more about the DNC List management ⇢
Rename Contact
If you want to edit a contact, you simply click on their name and hit the Edit Contact button when the menu drops down, modify the Last or First Name, and when finished, just press the Save button.

In case you've changed your mind and don't want to modify it anymore, click on Cancel.
Contact History
The Communication window will open on the right side of the screen, with all the Contact History that exists. This communication log between your company and this particular contact includes inbound and outbound calls, sent and received SMS text messages. It is a comprehensive view of all users and Caller IDs within smrtPhone.

You can see call details by clicking the blue arrow next to each communication log entry on the right side. If you need more information about the specific communication, check your CRM or look at your Logs inside of smrtPhone.
Please remember that the Billing and Logs tab is only accessible to the Account Owner and users with granted permissions.
Merge or Delete Contacts
If you find duplicate records, reconcile them from within your CRM, following your CRM's process for merging duplicate records. You can also see here if your contacts have duplicates.
If you want to delete the contact, go to the Contacts Page on your dashboard, hit the three dots, and select the Delete Contact option. Then, confirm your choice.
Please keep in mind that this action will be active for both, CRM and smrtPhone, will delete the contact from both places, if the case.
Paired Caller ID
The Contacts page also has the option to add a pairing caller ID for a specific contact.
The Pair Caller ID setup helps you to assign a particular smrtPhone number (outbound) to a specific contact in your contacts. Access smrtPhone Dashboard > Contacts Page > Contact of choice and then click on the three dots for more options.
Select Pair Caller ID and then choose from the phone numbers / caller IDs available in your system using the search bar, and save your option.

Paired Caller ID overwrites Geo Caller ID, Sticky Caller ID, and Individual Caller ID.
Once the Paired Caller ID is set for that contact, this smrtPhone number will always be used in an outbound call to that contact.
If you have a particular phone number default set by the Account Owner, a Sticky Caller ID, or a Geo Caller ID, the system will overwrite all the previous settings and use the Paired Caller ID you just set.
If your account was created after 11/06/2026, this information is for you!
Contacts Page
Access the Contacts Page straight from the main dashboard.
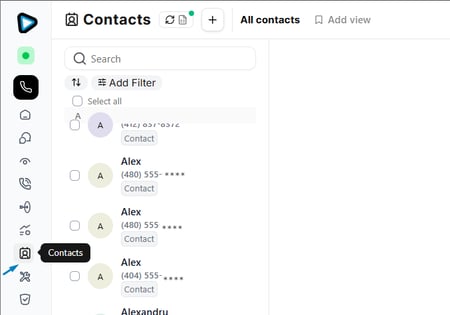
Here you can find a list of all your Contacts available on your account.
Contacts Options - Action Buttons and features
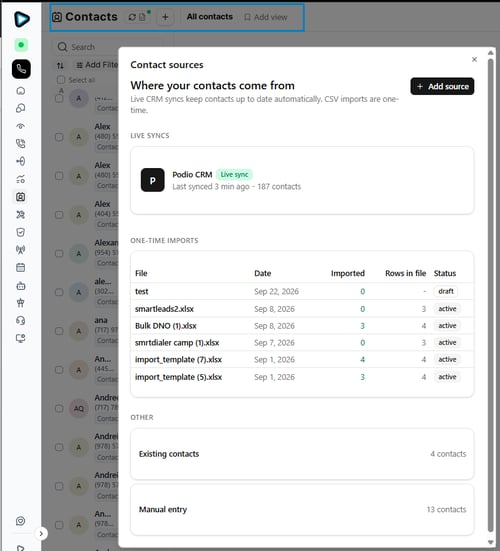
Starting from the top, you have the options:
-
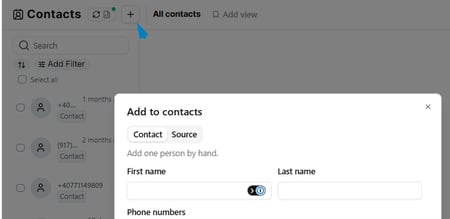
See where your sources - Right next to Contact, you have the option to see where your contacts came from (there are multiple possible sources, like CRM, imports) and you can see them in real time, and also their status. Here you can also add a new source of contacts by importing a file and naming the source.
-
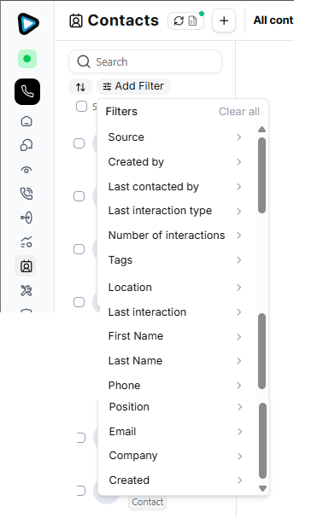
Filter contacts - Use the available filters for an easy sort: source, created by (what agent), last contacted by (what agent), last interaction type (call, SMS, or email), number of interactions (at least...), tags attached, location, last interaction (opens a calendar to see data frame and you can pick multiple days), first and last name, position (lead's position in the company if available), email, company or the date when it was created.
-
You can also use the sort button to see the contacts by last activity, name (alphabetically), or the most recently added ones.
- Search function
- Add new contacts - Either in bulk, using CSV or CRM import (source), or individually, by manually inserting details. Hit the plus button available next to Contacts.
- Add Views - Views are sorted Contacts by different criteria, saved to be handy. You can create and save your views and also edit and delete them at any point. Once deleted, they can no longer be retrieved.
You can see all your saved views next to the All Contacts tab.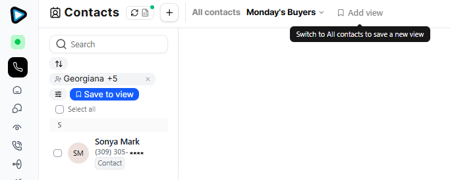
- Contact Details - When a contact is selected, you can see all the details, including the conversation history.
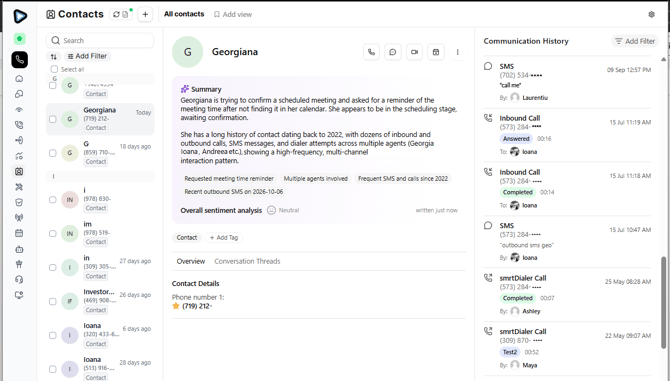
- Action Buttons: Call, Text, Video Call, Follow-up, View and Resync in CRM (if possible), Edit, Pair or Delete Contact
- Summary - Represents the whole communication history summarized with AI Tools for a better understanding of the relationship with the contact
- Sentiment analysis - A tool that identifies and classifies the whole interaction's tone
- Add Tag - To find it easier later
- Overview - Contact details - From address to email, everything that is available
- Conversation Thread - Easily see all interactions
- Communication History - Where you can filter all information by: Inbound/ Outbound Calls, Video Calls, Conference Calls, Transfer Calls, Contact Created, and SMS
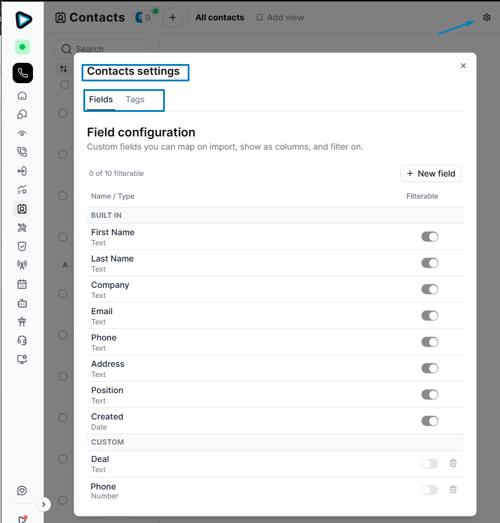
- Contacts Settings
- Fields - Custom fields you can map on import. You can see that there are several built-in fields, and you can create your own extra. Hit the New field button to add more. The built-in fields are not optional and cannot be toggled off.
- Tags - Labels you put on contacts by hand. Rename one at any time without affecting who carries it.